
Guide to Object-oriented Programming With Java (University at Buffalo Version)
Chapter 13: JUnit Testing and Using the Debug Tool
Testing an Application Using Junit
The eclipse IDE allows you to use Junit to create unit tests to test individual sections of yourr Java code.
A DistanceConverter.java Example
Before you can write any unit tests you need to create the application to be tested. For example, DistanceConverter.java
public class DistanceConverter {
public static double convertFeettoMeters(double feet) {
return feet * 0.3048;
}
public static double convertMeterstoFeet(double meters) {
return meters * 3.2808;
}
public static void main(String[] args) {
System.out.println("1 foot = " + convertFeettoMeters(1) + " meters\n");
}
}
DistanceConverter.java Code
1 foot = 0.3048 meters
DistanceConverter.java OutputCreating the Junit Test Template
Use the following steps to create a template Junit test for your DistanceConverter.java file.
- Right click on your
DistanceConverter.javaFile - Choose:
New -> Junit Test Case - In the
Name:field, type:DistanceConverterTest.java - Click the
Finishbutton
Note: The first time you use Junit you may need to click the link to setup the Junit 4 library in your project properties. - You should now see the template in the edtor window
java.io.util.Scanner to Read a File Codeimport static org.junit.Assert.*;
import org.junit.Test;
public class DistanceConverterTestEmpty {
@Test
public void test() {
fail("Not yet implemented");
}
}
java.io.util.BufferedReader to Read a File OutputAdding Test Cases
Now you are ready to add some test cases to the DistanceConverterTest.java file:
import static org.junit.Assert.*;
import org.junit.Test;
public class DistanceConverterTestEmpty {
double feet, meters;
@Test
public void testConvertFeettoMeters() {
feet = 2;
meters = DistanceConverter.convertFeettoMeters(meters);
assertEquals(meters, 0.3048, 0.001);
}
@Test
public void testConvertMeterstoFeet() {
meters = 2;
meters = DistanceConverter.convertMeterstoFeet(feet);
assertEquals(3.281,feet, 0.001);
}
}
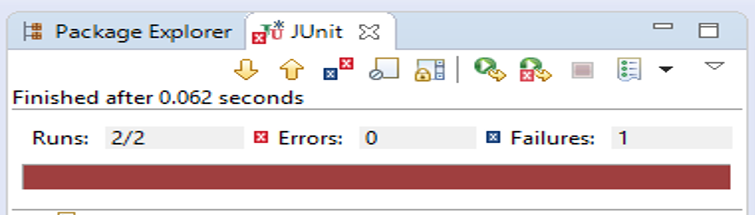
DistanceConverterTest.java CodeNow run your DistanceConverterTest.java file to produce the following window.

 edu.buffalostate.cis425.sp24.put-your-username-here.DistanceConverterTesttestConvertFeettoMeters(edu.buffalostate.cis425.sp24.put-your-username-here.DistanceConverterTest)
 testConvertFeettoMeters(edu.buffalostate.cis425.sp24.put-your-username-here.DistanceConverterTest)
DistanceConverterTest.java OutputNote: the above example has a test failure because the test case for convertFeettoMeters() is testing for feet to be a 2 but we assert (expects) it to be a 1.
Using the Eclipse Debug Tool
Eclipse has a built-in debug tool that provides a way to walk through your code and observe values for your variables and objects. You can set breakpoints so that when you run your code Eclipse will stop at the next breakpoint. This is a handly tool to determine if your variables have a value that you expect them to have and to help figure out why you may be getting unexpected results.
- Set a breakpoint:
Right-clickon the line number in your code- Choose:
Toggle Breakpoint
- Run your program in debug mode:
- In the Toolbar, click the
 Debug icon
The Debug Perspective (see Figure 13-8) will open
- In the Toolbar, click the
- The Debug View (top left window) shows your code structure (call stack)
- The Variables/Expressions View (top right window) shows your variables and expressions values
- The Breakpoints View (top right window) shows your breakpoints
- The Display View (middle left window) shows your code
- The Outline View (middle right window) shows your program structure
- The Console View (bottom window) shows your program output


 The Skip Breakpoints icon (
Ctrl-Alt-B) allows you to skip over all breakpoints The Resume icon (
F8) allows you to skip over all breakpoints The Suspend icon allows you to skip over all breakpoints
 The Terminate icon (
F2) allows you to skip over all breakpoints The Disconnect icon allows you to skip over all breakpoints
 The Step Into icon (
F5) allows you to skip over all breakpoints The Step Over icon (
F6) allows you to skip over all breakpoints The Step Return icon (
F7) allows you to skip over all breakpoints
